Camera Buying Guide For Newbie Photographers .
When one has to choose a right camera among bevy of choices, bare minimum of knowledge should be in mix with an informed, educated decision. This support is sought-after when anyone from us can differentiate between a good pic taken and a bad one. So, the immediate and most important things become so vital to be known as we go shopping for a camera. Maintaining our custom, we are here to share our two-cents in the form of a clear and one-for-all camera buying guide.
So, let us start with those factors/drivers which make camera-shopping such an intriguing mission?
This question finds destination in the following:
- ISO
- Aperture
- Shutter Speed
Collectively, above-mentioned three are known as the Exposure Triangle, because they control how much light you’re exposing the camera to (aperture), how sensitive the camera is to that light (ISO), and how long your exposure lasts (shutter speed).
Taking a cue from this, we all see things as light fall onto them and light plays THE affective role in photography. So, all cameras can create or capture an image but to make that picture perfect, one must know the factors that influence how an image is created.
Explaining the Exposure Triangle:
1. Aperture:
If you look at an old, manual lens, you can see the opening where light comes through. When you adjust your aperture settings, you’ll see that opening get bigger and smaller.
• The larger the opening, or wider the aperture, the more light you let in with each exposure. (Smaller Number)
• The smaller the opening, or narrower the aperture, the less light you let in. (Greater Number)
2. Shutter Speed:
When you press the shutter button on your camera and take a picture, the aperture blades take a specific amount of time to close. This amount of time is known as your shutter speed.
When you increase your shutter speed—the length of time where the sensor is exposed to light—two important things happen.
1. The sensor is exposed to more light because it’s been given more time. This is useful in low light situations.
2. The sensor is subject to more motion which causes motion blur.
Some Classic Examples of Playing with the shutter Speed:
Those white streaks of lines are stars moving. This is captured by slowing the shutter speed to 25 minutes – and it’s only possible in DSLR!
You can see every splash of water crystal clear – this high speed photography, shot at 1/200 second at 7 frames per second. Cameras usually indicate their fastest shutter speeds in terms of hundredths of even thousandths of a second.
3. ISO:
The faster the film speed, the more sensitive it is to light. This still applies in its entirety to digital photography, but is referred to as ISO rating instead. For daylight photography we use low ISO usually 100 or 200.
High ISO is particularly useful for picking up more detail in a night/dark photography without reducing the shutter speed or widening the aperture more than you want to, but it comes at the cost of quality. The higher you increase your ISO, the more noise you get.
All camera brands boast the same set of features; don’t always go for the expensive ones, but as per your requirement. Other important and key features to look for are –
1) Megapixels –
It determines the resolution of the image. As we all think, the higher the number of megapixels (MP), the better the image quality right? NO! A higher megapixel sensor is great, but the final image quality depends a lot on the sensor size. Most DSLR sensors are about 24×16 mm (APS-C size). For them, as resolution, increases, noise increases too. With the current technology, 18 MP is the right balance. A 12 MP sensor can give you a 12″x16″ (approx. A3 size) picture at the highest detail. This is more than enough for day to day use!
2) Sensor and its sizes –
Cameras with larger sensors and better lenses normally take better shots, regardless of megapixel count. Bigger sensors normally create better images, as do higher-quality lenses; this is why DSLRs take such stunning photos. If you can’t get any hands-on time with a camera before deciding whether to buy it, make sure to check the specs to see its sensor size, and compare it with any other camera you are considering purchasing.
Typical terms you’ll run into when examining camera sensor types are CCD (charged coupled device) and CMOS (complementary metal-oxide semiconductor). When considering sensor size, you’ll confront terms like four-thirds and micro four-thirds, APS-C, full-frame, etc. Here are some of the different sizes for sensors:
- Full Frame Sensor (or 35 mm film size) – They are pretty expensive but have their advantage over capturing more details and giving more depth to pictures. Mostly used by professionals for commercial works
- APS-C – Almost all of the starting models in DSLRs have APS-C size sensor, They are smaller in size when compared to full frame, therefore capturing lesser details but there is no compromise in quality. They give an amateur’s advantage of crop factor – as in Canon (1.6x) & Nikon (1.5x) – which means lens focal length gets boosted by that crop factor when using a zoom lens.
- Four Thirds System – All the digital Cameras have this sensor size but the difference can be seen in the quality as compared to normal compact cameras.
Note that sensor size is important, since a higher megapixel camera needs a bigger sensor to deliver up to the mark results. However, for our daily shots/small prints, an APS-C size sensor is a good choice.
3) Lenses –
If you’re buying your first DSLR, you’re in an enviable position. You have a wider choice as you’re not stuck to a single brand, so can pick and choose the perfect package for your needs. All manufacturers offer a choice of body-only or body and lens kits, the latter being by far the best choice for beginners.
These kits bundle relatively inexpensive, mid-range lenses with the choice of fair-to-good zoom, depending on how much you want to spend. When looking at the focal length, a 50 mm focal length lens is normal for a full frame camera. Less than 50 mm is on the wider side and above 50 mm is a zoom lens.
The different types of lens based on their focal length are as follows:
- Ultra Wide Angle (less than 18 mm) is good for very large scenes where lens distortion adds to rather than detracts from the appeal.
- Wide-angle (around 18 mm to 30 mm) is good for group shots, landscapes, and street photography.
- Normal (about 30 mm to 70 mm) is good for portraits and snapshots.
- Telephoto (about 70 mm to 300 mm) is good for portraits and sports.
- Super telephoto (greater than 300 mm) is good for sports and wildlife shots. It usually consists of an 18-55 mm lens, which gives a respectable wide angle at the 18 mm end, and a moderate zoom at 55 mm. More ambitious users should look towards an 18-135 mm lens, which pins the wide angle but offers a significantly improved zoom although you’ll pay slightly more for the privilege. One can also look at third party lenses which are relatively cheaper and offer decent image quality (Tamron and Sigma, for example).
4) High Definition Video Quality –
Many DLSRs now offer Full HD video resolution (1080P) & HD (720P). And because you can take advantage of a variety of lenses, including fish-eye lenses, you can achieve interesting video effects with an SLR. Remember that video requires a lot of storage space, so plan accordingly.
Now a day’s a lot of movies are being shot on DSLRs only.
5) Size, Weight and Durability -
As mentioned above, digital SLRs come in a variety of shapes and sizes from the ultra-compact entry-level models to the tank-like professional models. If you’re likely to do a lot of shooting in damp, humid or dusty conditions you’ll need to look for a DSLR with some kind of weather-proof sealing and a solid magnesium alloy chassis.
Obviously this kind of durability doesn’t come cheap, though there are plenty of mid-range models that offer some level of protection from the elements. If you travel a lot, and don’t want to carry any extra weight, you can opt for a plastic body camera since they are smaller in size and lighter than the weather proof models.
6) Additional Perks -
You may look for more inbuilt features offered in many starting range DSLRs. These include:
- HDR Mode – For High Dynamic Range pictures
- Colour Selection – Lets you select one colour and leaves the rest of the photo in black & white
- Miniature Mode – Everything in the image appears as a miniature toy model.
- Preset Modes – Companies take average settings from every scene for different purposes and present them in different ways. Different kinds of presets include Portrait, Landscape, Night Portrait, Macro, Night Vision, etc.
Let Us Talk About the Regular Cameras
Though starting out slow, with inferior quality to regular SLR cameras, DSLR cameras are now top of the line. They offer faster performance, more control over settings, interchangeable lenses and better image quality than most top-of-the-line point-and-shoot cameras. Most importantly, they give you the ability to play with the image, and get creative with the settings and overall look of the final image.
Many DSLRs now feature preset shooting modes, friendlier interfaces, helpful guide modes, and more compact designs. A good number are also being featured as tough cameras that can weather difficult conditions and be used underwater.
A good number of DSLR cameras are available for well under Rs 30,000-35,000, but can go up in cost to as much as 2 lakhs. Either way, a DSLR is a considerable investment. How do you choose the right one? We’ve got some tips on buying a DSLR, along with certain things you need to know before buying. We also outline some of the best DSLR cameras on the market, depending on your budget range.
Freeze Dried Food
The next post will be on Which camera to buy in 2014?
You can comment your price range. According to that i will be posting my new post
 “love story” captured by b-bee
  “Dubai Skyline” captured by Bella
 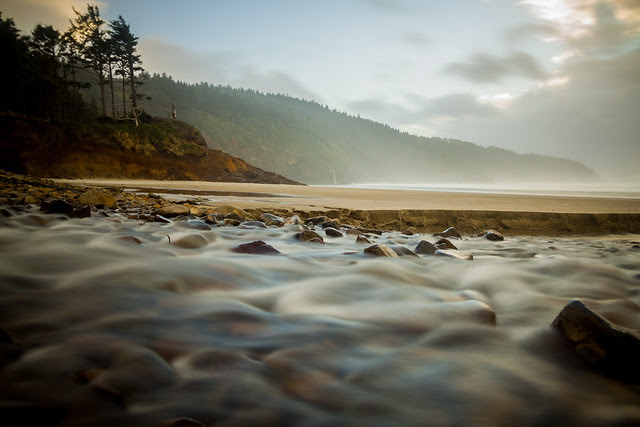 “Sunshine” captured by Luke Detwiler


